
Other Ice Cream Posts
Chocolate Ganache – BEST Add-In Ingredient for Ice Cream
Check out more desserts at My Confections
Other Ice Cream Posts
Chocolate Ganache – BEST Add-In Ingredient for Ice Cream
Check out more desserts at My Confections
Fabulously light, gluten free cake that can be flavored any way you like.
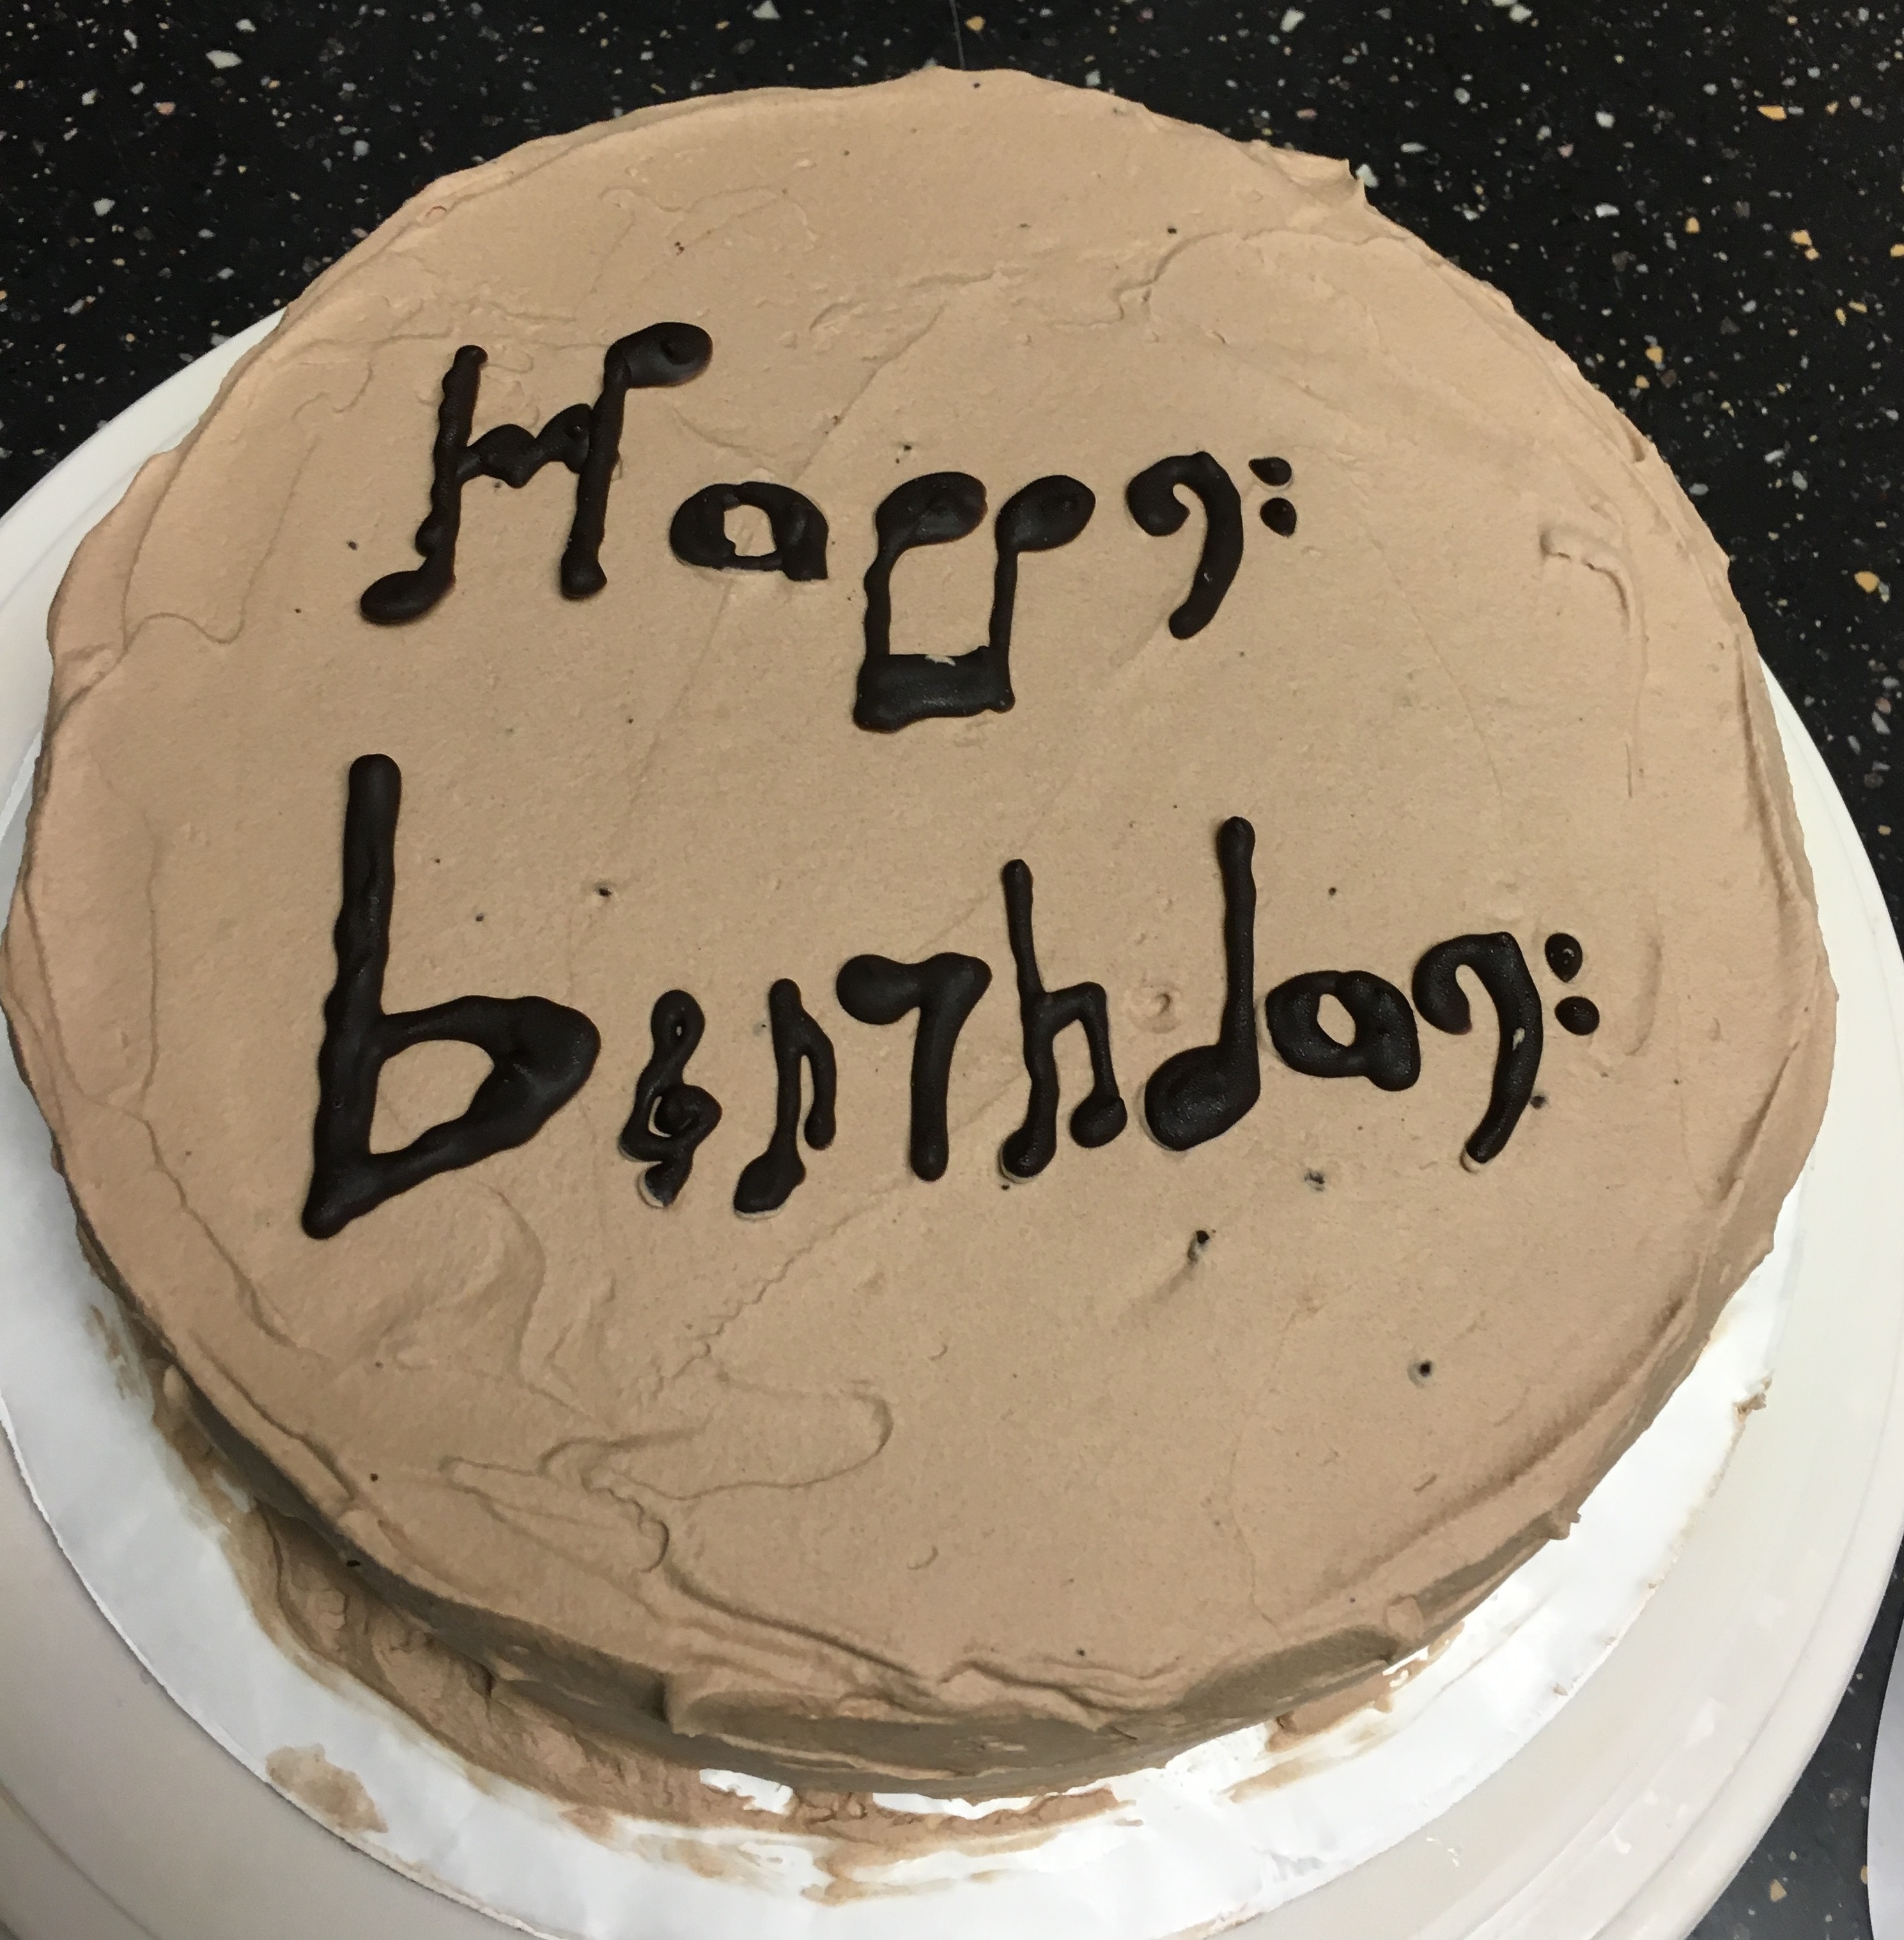
This is a very different kind of cake. Instead of actual or traditional cake, there are two layers of baked meringue. There is a layer of whipped cream between the rings of meringue and frosted on the top and outside with more whipped cream. The entire cake is then placed in the freezer. After one day, the meringue softens a bit and has an amazing texture.
This is the second time I made a version of this cake. For the chocolate whipped cream I used: 2 cups of heavy cream, 6 Tbls. of Ghirardelli hot chocolate mix, and 6 Tbls. of powered sugar. I had to go to a few stores to find this kind of hot chocolate mix, but as I have mentioned before using top notch chocolate ingredients is essential to obtaining the best flavors.
Essentially, this cake could be done using an flavor whipped creme that one desires. The options are endless.
Note: The top Happy Birthday decorating was done in dark chocolate. I allowed the whipped cream to harden first before placing the lettering on top.
Original Recipe: (http://www.foodnetwork.com/recipes/giada-de-laurentiis/frozen-meringue-cake-recipe.html)
Frozen Meringue Cake
Recipe by Giada De Laurentiis
Ingredients
Meringue:
4 large egg whites, at room temperature
3/4 cup superfine baker’s sugar
1/8 teaspoon cream of tartar
Pinch fine sea salt
1/4 teaspoon pure vanilla extract
Cream:
2 cups heavy whipping cream
2 tablespoons powdered sugar
1/2 teaspoon pure vanilla extract
1 1/2 cups fresh raspberries (6 ounces)
Syrup:
1 1/2 cups fresh raspberries (6 ounces)
1 cup balsamic vinegar
3 tablespoons maple syrup
1/2 cup fresh raspberries, for garnish, optional
Special equipment: One piping bag fitted with a plain 1/2-inch tip
Directions
For the meringue: Place an oven rack in the center of the oven and preheat to 200 degrees F. Line a baking sheet with parchment paper. Using a pencil, trace two 8-inch-diameter circles, side-by-side, on the parchment paper.
Beat the egg whites until fluffy in a stand mixer with a whisk attachment. Gradually add the superfine sugar, about 1 tablespoon at a time, with the machine running on medium-low speed, until the mixture holds soft peaks. Beat in the cream of tartar and salt. Increase the speed to high and beat until the mixture is thick and holds stiff peaks, 3 to 5 minutes. Beat in the vanilla extract. Place the meringue in the piping bag. Pipe the meringue into two 8-inch circles on the prepared baking sheet using the traced circles as a guide. Bake until crisp, 2 hours. Turn off the oven and allow the meringues to cool completely while still in the oven, about 2 hours.
For the cream: Beat the cream on high speed until thick using an electric hand mixer. Add the powdered sugar and vanilla extract. Continue to beat on high speed until the cream holds stiff peaks. Add the raspberries and beat until incorporated into the cream.
Spread one-third of the cream over each meringue circle. Place 1 circle on top of the other to create 2 layers. Spread the remaining cream on the sides of the cake. Garnish with fresh raspberries if using, and freeze the cake until firm, 3 hours.
For the syrup: Mix the raspberries, vinegar and maple syrup in a small saucepan. Lightly mash the raspberries using a fork. Bring the mixture to a boil over medium heat. Reduce the heat to a simmer and cook until thick, 25 to 30 minutes. Strain the mixture through a fine sieve and allow to cool.
To serve: Allow the cake to sit at room temperature for 15 minutes. Cut the cake into wedges and place on serving plates. Drizzle with the syrup and serve.
See Related Post:

Frozen meringue cake with Bailey’s Vanilla Cinnamon Whipped Cream
For this version of the whipped cream I used: 2 cups of whipped cream, 1/4 cup of powered sugar, and 1/4 cup of Bailey’s Vanilla Cinnamon Irish Creme.
 Complimentary desserts to the standard pumpkin, apple, and pecan pie.
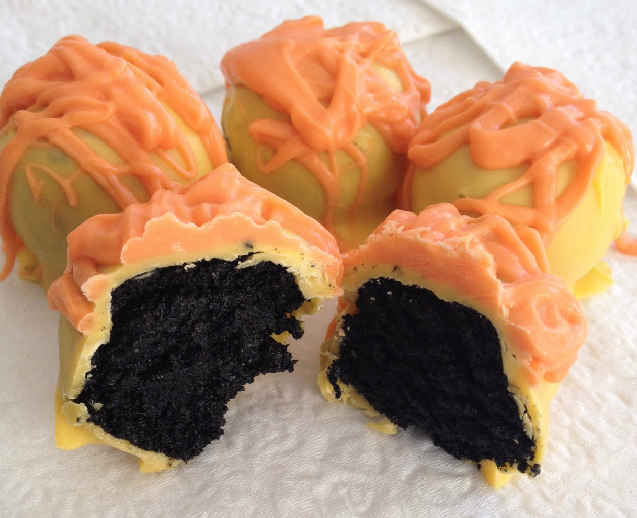
When there are a lot of desserts on a table, guests often like to enjoy a sample of many. A slice of pie or cake tend to be large servings. Small pick-up desserts are a nice compliment. I like to stick to flavors of the season. The middle plate holds nut crescent cookie, which are filled with a combination nut filling. Nuts are always in season this time of year. The bottom plate holds Dulce de Leche fudge. While caramel apples are about a month past their prime – caramel is usually a welcome flavor. Finally, the top plate holds oreo truffles – no matter what the season is, chocolate lovers want chocolate desserts.
Oreo Truffles
Grind together 1 package of Oreos and 1 8-oz pkg of cream cheese in food processor. Roll into balls. Place in freezer for about 30 minutes. Dip in chocolate.
Dulche de Leche Caramel Fudge ( recipe from http://chocolatechocolateandmore.com/dulce-de-leche-caramel-fudge/ )
3 cups white chocolate (use a good chocolate – don’t use chips)
2 Tbls butter
Melt the above ingredients in microwave (don’t over cook)
Stir in 1 tsp. of vanilla and 14 oz of Duce de Leche caramel (usually found in hispanic section at grocery store)
Pour into foil lined 8×8 pan. Chill in refrigerator for at least 2 hours.
In addition, to the above desserts, I also made:
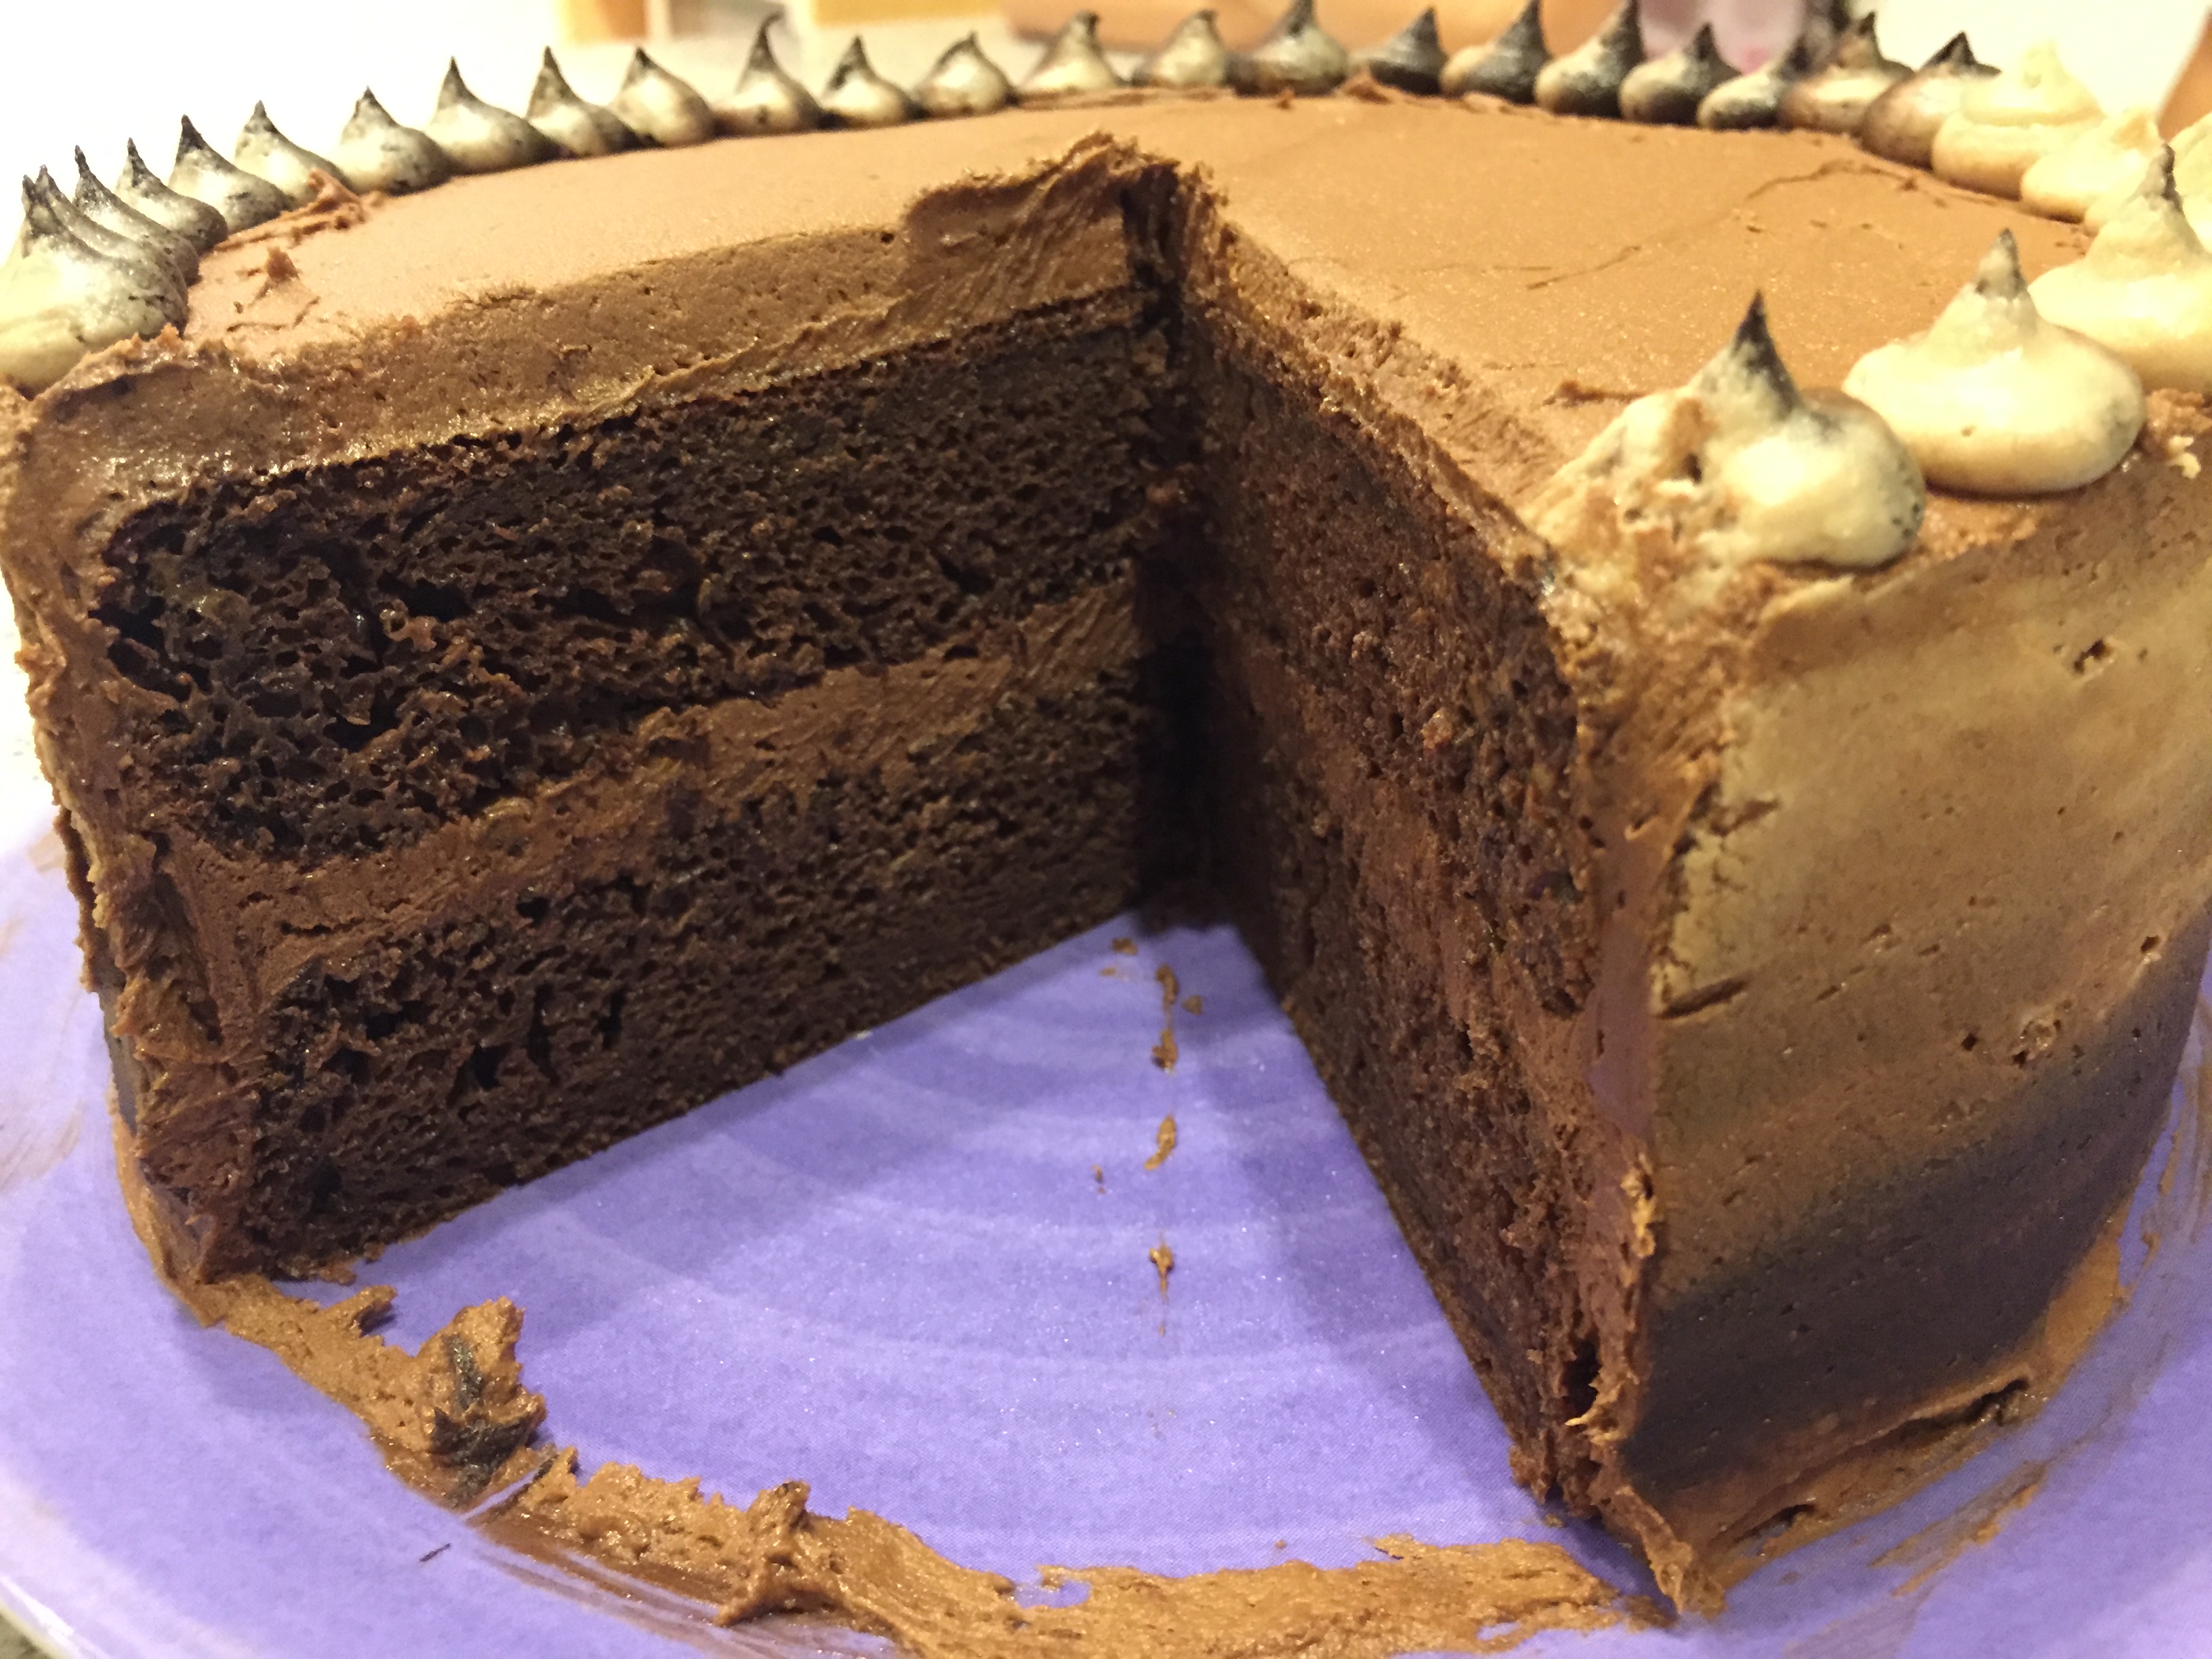
Chocolate Loaded Cake (gluten free)
I aim to please when making birthday cakes for family and friends. This cake is dedicated to my daughter that believes chocolate cake lacks enough chocolate.
The bottom layer is a flourless chocolate cake. The middle layer is chocolate mouse. And the outside is chocolate ganache. This cake is absolutely not lacking chocolate!
Flourless Chocolate Cake
Chocolate Mouse
Chocolate Ganache
Keep cake in the refrigerator until ready to serve.

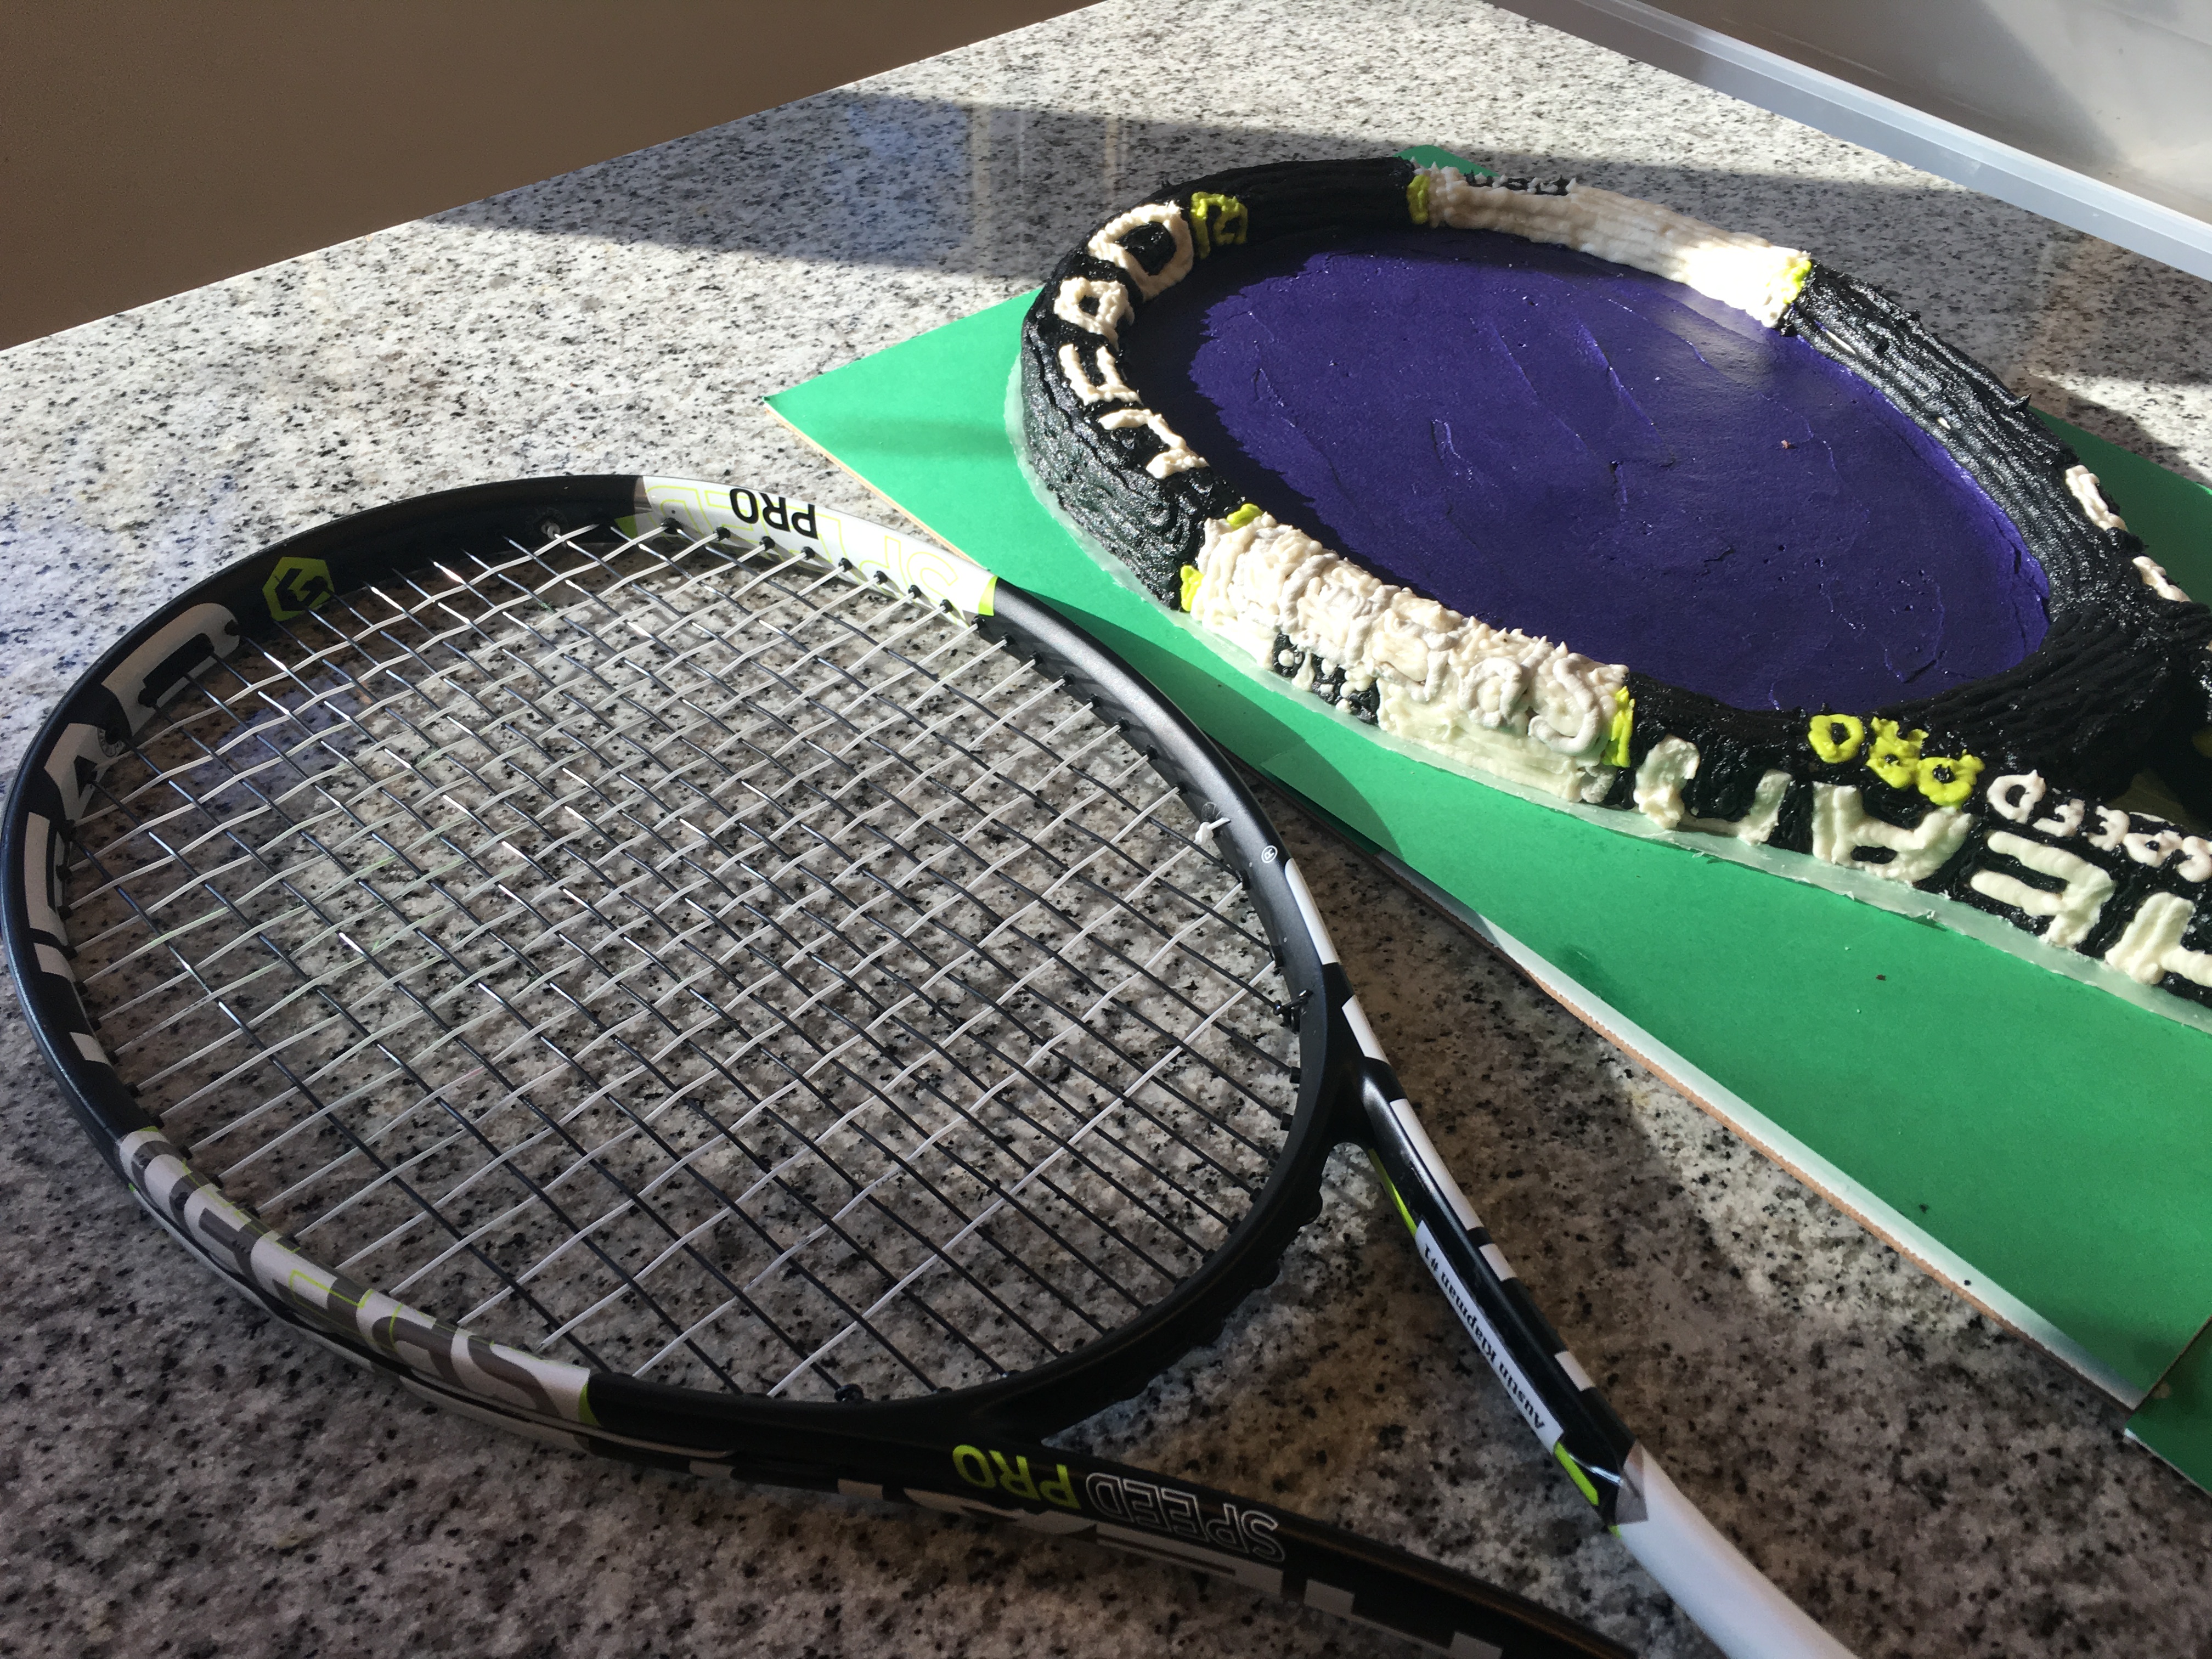
What kind of cake does one make for a 16 year old tennis player? I’ve already made a cake in the shape of tennis ball.

When I asked him what he kind of cake he wanted, he joking said “my tennis racquet.”
I thought about his request for a few days. It sounded a bit nuts. Then, I thought I’m just that nuts to take on this challenge.
Here’s how the project went along.
First, I traced the actual racquet to make a template for cutting out the cake and planning how to plate and store the cake. Both were a challenge because of the size. A full size racquet is 27 inches long. I didn’t have a container large enough to store the entire cake. I needed to be able to split the cake in order to store in two different containers. You can see the split I made in the cake plate (pre-cut cake cardboard covered with green paper and wax paper).

I then had to choose an appropriate cake recipe. I needed one that was dense enough to be cut into sections. I’ve used a pound cake in the past to cut into shapes, but I wanted to find something different this time. I found a recipe online that suggested using a cake mix but only using 1/2 the oil and 2 Tbls less of water. I needed a lot of cake for this project (again a BIG cake). I used my 12 x 18 inch pan, which requires 2 cake mixes worth of batter.
The cake baked nicely and luckily popped out of the pan without any fuss or cracking. After the cake cooled, I leveled the cake. I cut my cake template into three pieces and placed them on the cake. I cut out each section carefully, making sure to keep my knife perpendicular to the table. I then assembled the pieces of cake on the cake plate.

Because the strings on a racquet are in the center of the frame, I needed a separate surface for the strings to appear. I used my cake level to cut the cake in half horizontally. I cut out the center, leaving just enough cake for the racquet frame. I then removed the cake.

I also had to cut out the throat of the racquet. The entire cake then needed to be skim-coated with a thin layer of frosting. This step seals in the cake for freshness and allows the top frosting to go on smoothly.

I allowed the frosting to dry before placing the two sections in containers for the night.
I wasn’t done for the day, yet. Dyed frosting needs to sit overnight. I first whipped up a batch of vanilla white frosting. I took about a cup of it and dyed it bright yellow-green. The second batch of frosting, I dyed “tour purple” (which looks like a deep purple or indigo). This took a lot of purple dye and quite a bit of blue to attain the perfect shade.
Why purple? The club where my kids practice painted the courts “tour purple” this year. It allows players to see the ball more clearly because the yellow ball is in direct contrast to the purple. Here’s a pic of the actual racquet on the actual court.

To end the evening, I whipped up a batch of chocolate frosting and dyed it black.
EXHAUSTED – that’s what I felt like at this point in the project. I called it a night.
I woke up the next day refreshed and ready to pipe some frosting. I frosted the racquet face first so that it would have time to dry before I piped the strings. Then I went to town on the racquet frame. I started with all the lettering and details and then filled in with the color. I wanted all the frosting to be a single surface (smooth like a racquet).
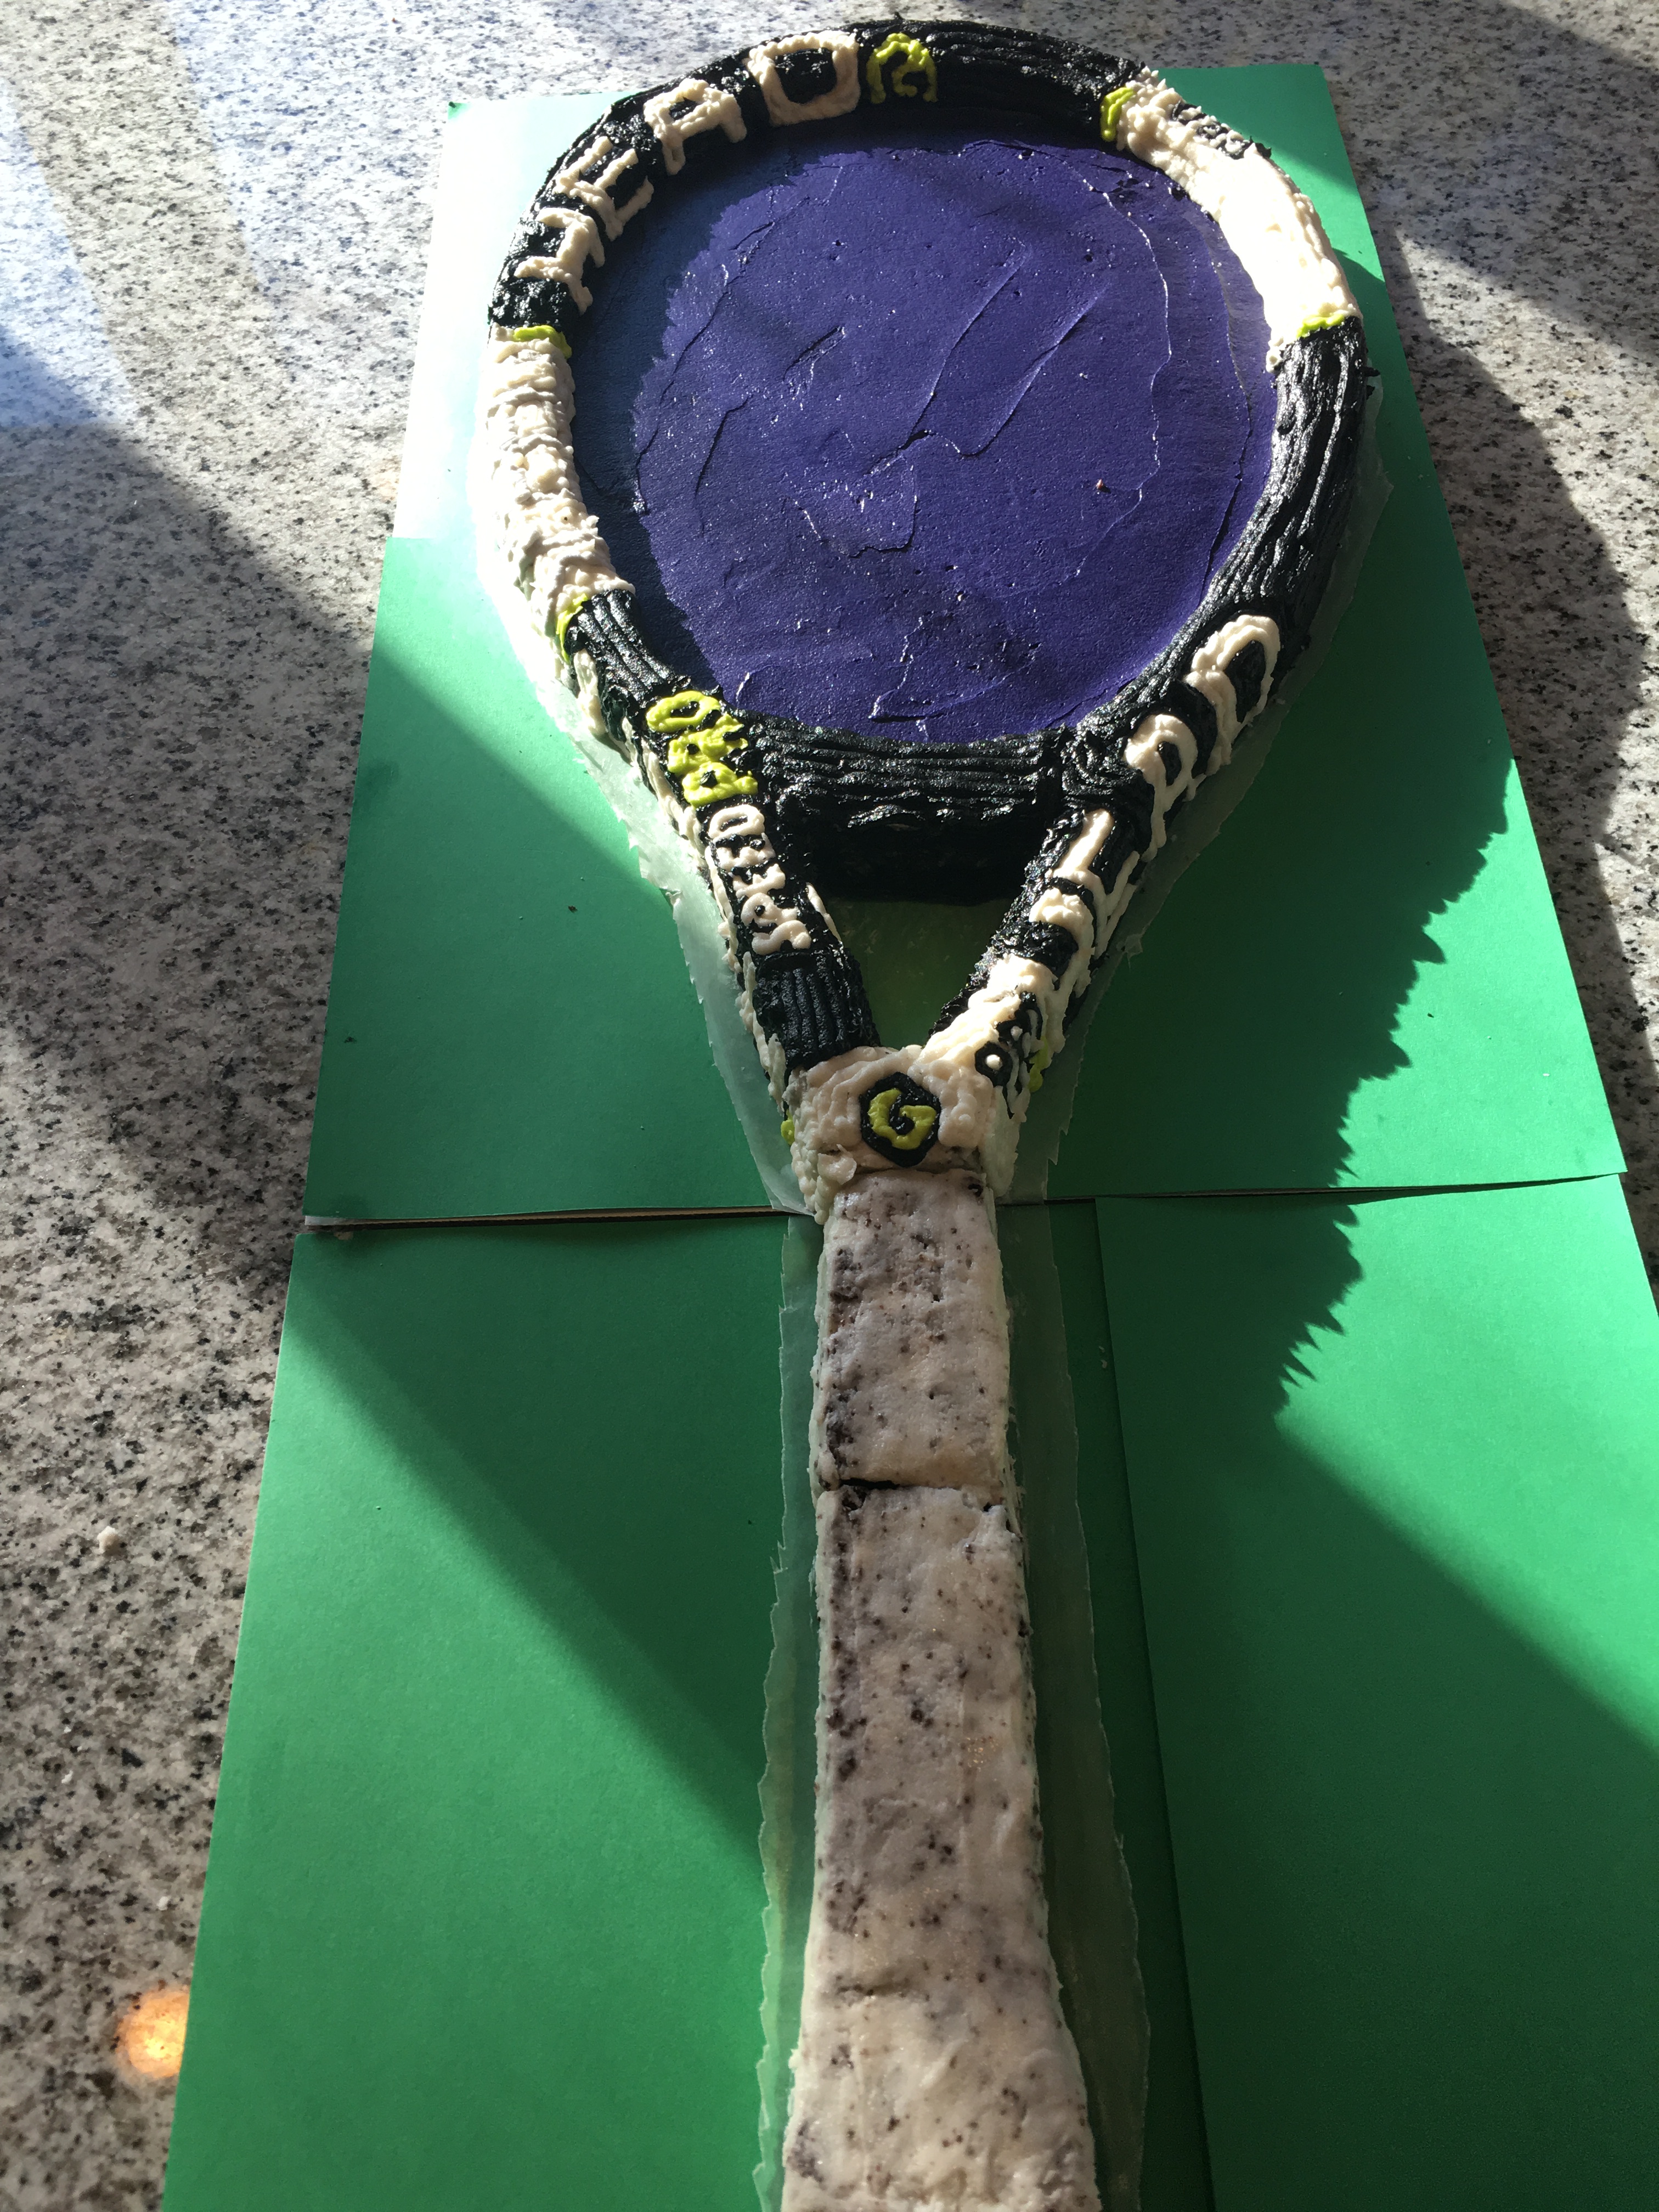
Next, I piped the racquet handle to look like it was wrapped in a grip.

I even piped the end of the racquet to replicate the Head logo.
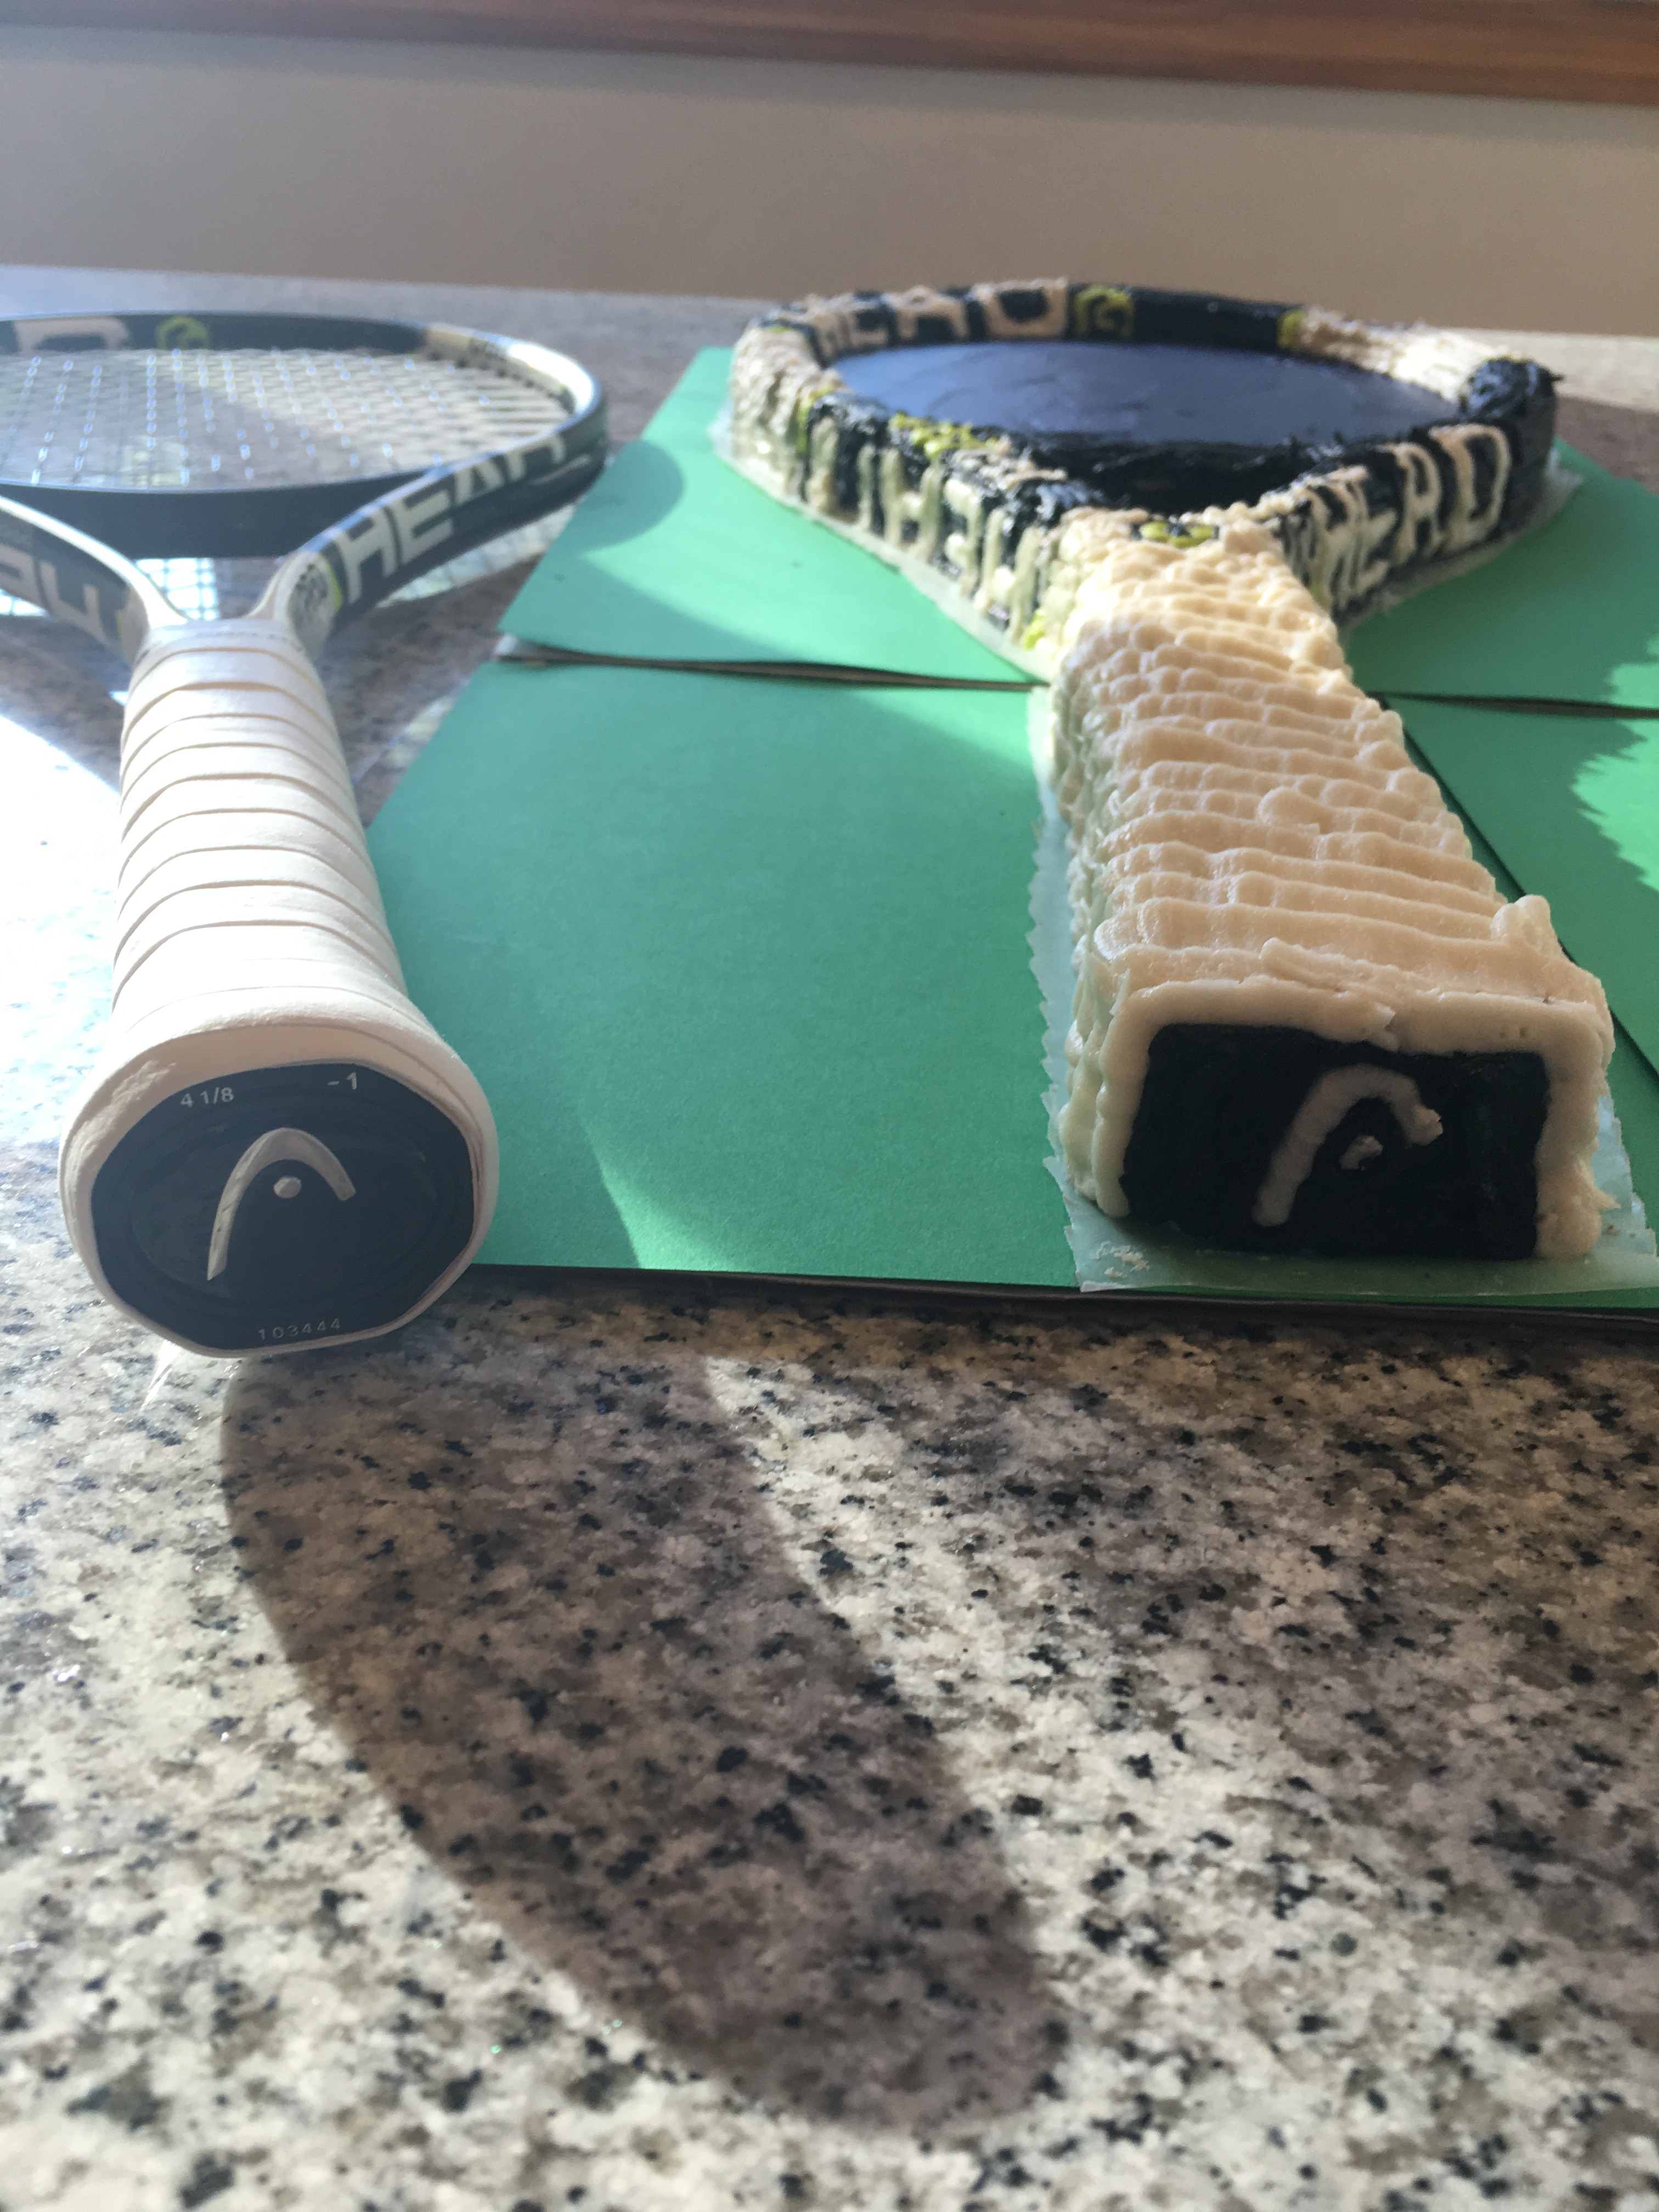
Lastly, I needed to pipe the strings. The problem? Strings on a racquet are woven. A fact I know all too well because I string my kids’ racquets. How did I do this with frosting? I piped every other main (black) string first. Then I piped every other cross string (white). I finished piping the black mains. Then I finished with the white crosses. Thus, most of the strings actually appear to be woven. I could have used a basket weave technique, but the breaks in the piping would have detracted from the overall appearance.

Here are a few more close up photos of the cake:


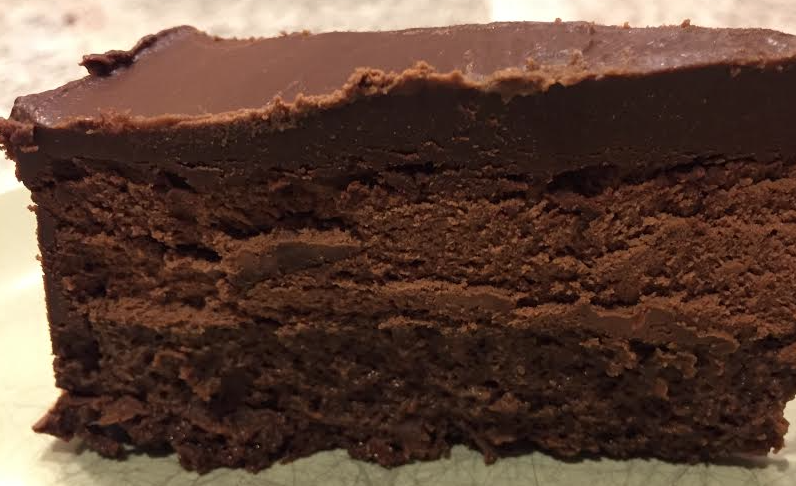
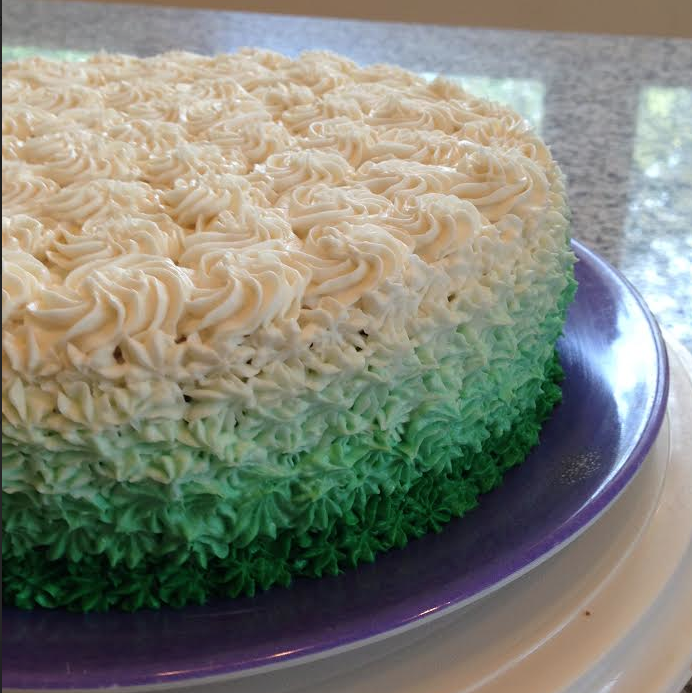
Ombre cake for a chocolate lover.
For this style cake, I coated the entire cake with a regular chocolate frosting (as seen on the top of the cake). I made three other chocolate frostings: one with hardly any chocolate, one with some dark chocolate cocoa powder, and one deep rich dark chocolate. I place numerous dots of the lightest chocolate frosting at the top third of the cake. Placed an equal amount of dots of frosting of the 2nd kind of chocolate frosting in the middle third. Then, I placed dots of the dark chocolate at the bottom. Before the dots had time to dry, I took a spatula and lightly spread the dotted frosting around the cake. The love how the texture of the underneath chocolate bled through the top dotted frosting.
I used a simple tie-dye technique for the top decoration, using same three levels of chocolate frosting that I used for the side of the cake. I placed all three frostings into one piping bag and went to town on the top of the cake.
The inside of this cake is a layer of whipped chocolate ganache. It has the intense chocolate flavor of ganache with the lovely texture of frosting.
With multiple kinds of chocolate, it’s a chocolate lover’s dream cake.
See Other Ombre Cake Post
See Other Tie-Dye Post


After multiple requests from my daughter, I decided to attempt a flag cake. Well, I learned a few things during the process. First, don’t take short cuts. I bought cheap cake mixes to make the red cake part (trying to save time and a bit of my sanity). It crumbled when I cut it and therefore I couldn’t make as many layers from each 8 inch round. Also, I should have chilled each layer of cake before slicing it to make clean cut layers. Perhaps making all the cake the evening before would have worked better. Second, the white chocolate chips for stars was a failure. The chips simply melted into the cake. While that added to the taste of the cake, it failed to give the appearance of stars in the blue section. In the end, it was festive. But no, I would not repeat this cake.
I wouldn’t call this project a complete bust. I had a ton of cake left over from all the trimmings. I decided to turn it into cake balls. For me, the best part of this project was that both of my kids got involved in it. It has been years since my son has wanted to “play” in the kitchen. To see both my son and daughter at the kitchen table rolling dough into tie dye bundles was a bigger treat for me than any sugary dessert. Fourth of July is a great opportunity for a bit of family time. Having both my kids in the kitchen with me made this the best Fourth of July that I can remember.

My daughter and I decided that these cake balls were too pretty to coat with white chocolate and decided to leave them chocolate-less.
Check on my post on cake balls for directions on how to make these little bite size dream balls.
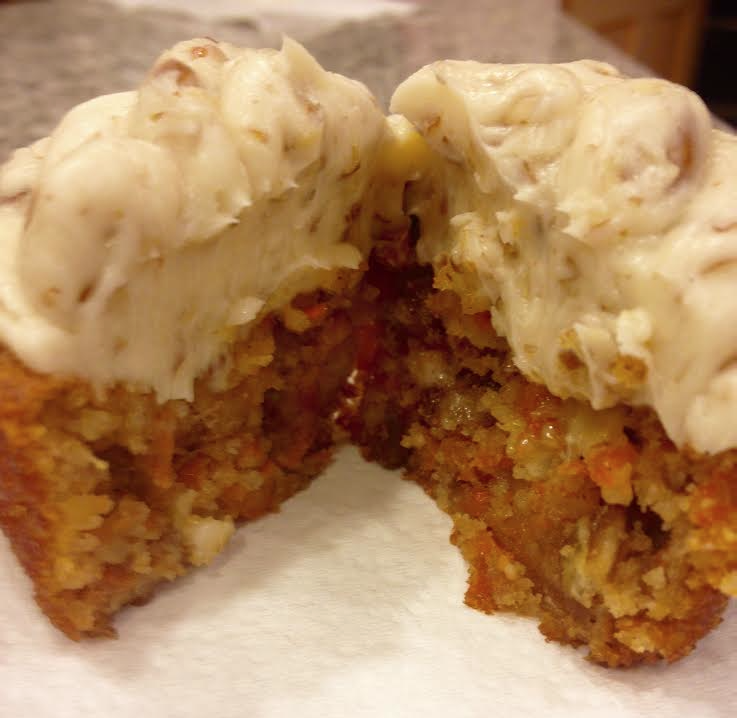
OMG! If I ever see a carrot cake with a boring plain cream cheese frosting I may cry. After tasting this carrot cake with a maple pecan buttercream, I can NEVER go back to boring. I owe all my inspiration for this combination of a nutty frosting combined with carrot cake to The Vegan Muffin Woman. See her recipe I would have tried her recipe, but I didn’t have the necessary ingredients on hand. Instead, I used a Maple Pecan Buttercream Frosting recipe from The Food Charlatan. (Recipe below)
The actual carrot cake was a spectacular surprise. I had been craving carrot cake for 3 months now, but I kept getting side tracked in the kitchen. Since I’m gluten free, it makes finding a good recipe difficult. In the past, I’ve used rice flour to substitute in other recipes but the cake turned out way too dense. By just tasting this cake you would never imagine that not only is it gluten free, but sugar free, as well. It is based on a combination of almond and coconut flour. The sweetness comes from crushed pineapple and honey. It was light and fluffy … amazing for a gluten free cake. I found the recipe on the site Gluten Free Mix (although a bake mix was not necessary for this recipe).
Even if you’re not gluten free, I really suggest trying this cake!
Gluten Free Carrot Cake
* Some notes on this recipe. If you have an oven that tends to turn things dark quickly, lower temperature to 325. This recipe is perfect for an 8×8 glass dish, pie plate or 12 cupcakes. For a layered cake or 9×13, double the recipe 🙂
Instructions
Notes
I used regular syrup and substituted vanilla extract for the maple extract and it tasted amazing!

Blueberry Cheesecake, the antioxidants make it healthy, yes? This is an incredibly light cheesecake. It bakes perfectly ever time. I’ve never had a problem with the top cracking. If you never had blueberry cheesecake, you’re missing out. I like this a lot more than strawberry or raspberry cheesecake. The only problem with this recipe is that it is baked in a 9×13 pan and I don’t like serving it directly out of the pan. I usually pre-cut the pieces and either display them on a large tray or set each individual piece in a aluminum foil muffin paper. Any way you cut it, it is delicious.
Extra cake, frosting, and some chocolate – why not make some cake balls? Last week, I made a multi-layer birthday cake. Each layer, must be leveled (slicing off the top of each cake so that top and bottom are perfectly parallel). This is essential to making a cake look “professional.” While it is one extra step in the process, it’s one that my kids most appreciate – the extra cake that is. Usually I just let my kids snack on the extra cake. Because I had actually baked 6 layers of cake there was a LOT of extra cake. In fact, there was so much cake that I took five of the “tops of cake” and made an entire extra layer cake. Okay, it looked terrible, but my kids didn’t complain while eating it. I still had an extra full layer of chocolate cake and a bit of chocolate frosting left over. I threw the extra cake in the food processor and mixed it with the extra frosting. I chilled the mixture and formed small balls. After popping the balls in the freezer for a bit, I coated them in chocolate coating (I had a lot of chocolate left over from the cake, too). I realize that the cake ball craze is pretty much over, but they still are a great treat. Unfortunately, they are very labor intensive, which makes them expensive to purchase and a pain to make. This was an ideal time to make the cake balls. I had all the ingredients on hand and I would hate to be wasteful.
Thus, one man’s trash is a dessert lover’s treasure.
