Snickers Cupcakes

Snickers Cupcakes


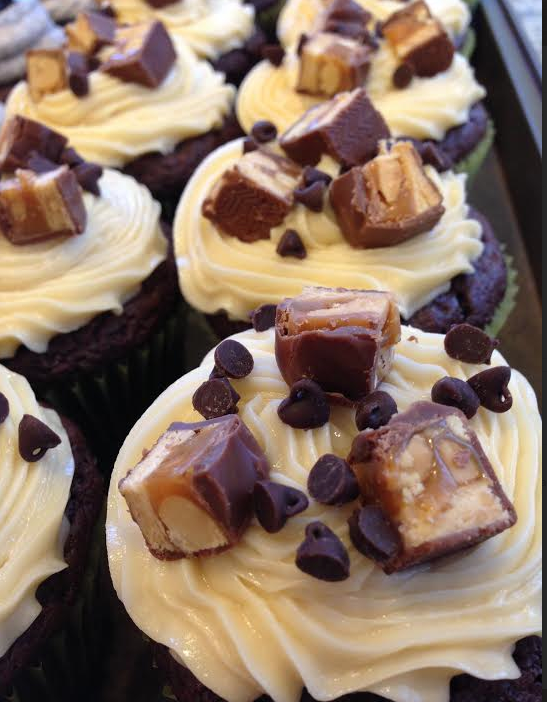
Chocolate, caramel, nugget, and peanuts – oh how this combination satisfies!  Just like the Snickers’ commercials suggest, the Snickers make these a satisfying cupcake.

It’s a chocolate cupcake with a surprise Snickers bite inside.  It has a caramel frosting and is topped with more Snickers pieces and a sprinkling of mini chocolate chips.

Most importantly, make sure you buy enough Snickers bites for inside the cupcakes and to cut into pieces to lay on top.  Also, buy some extra, because it’s nearly impossible not to snack on some while making and baking these cupcakes.

Directions:

Chocolate Cupcake:

Any favorite Devils Food recipe will do (even a box cake mix).  After placing paper in muffin tins, fill the muffin cups with about 1 tablespoon of batter – enough to cover the bottom of the muffin paper.  Next, place a Snickers Bite on top of the batter in such a way that the candy is centered and is perfectly parallel to the bottom of the muffin tin.  Place another heaping tablespoon of batter on top of the candy.  Smooth out the batter on top of the candy.  The entire muffin cup, candy included, should be filled about to 2/3 to 3/4.  You probably with be able to make a few more cupcakes than you normally do with the same mix.  Reduce your baking time by 5 minutes and carefully watch.  A cupcake is done when you touch the top and the cupcake springs bake a little.

Caramel Frosting  (no need to double frosting recipe – I always plan for lots)

2 sticks butter

1/2 cup caramel sauce

1/2 tsp salt

4 cups powdered sugar

Beat butter, caramel sauce, and salt until smooth.  Add the powdered sugar slowly and beat until a fluffy frosting forms.  Pipe immediately.

HAPPY BAKING!


Happy National Smores Day

Smores Cups

Here’s a small bite size alternative to traditional smores.  It has a graham cracker based crust.  I used dark chocolate instead of standard milk chocolate, which was less sweet and a nice compliment to the marshmallows.  Of course, it’s topped with a toasted marshmallow.

Recipe:

Ingredients:

8 honey graham cracker sheets

6 Tbls of melted butter

1/4 cup of powered sugar

12 Hershey’s dark chocolate miniatures, broken in half

12 large marshmallows, torn in half

Directions:

Preheat one oven to bake at 350 and set another oven to broil

Spray 2 12-cup mini muffin tins with cooking spray

In a food processor, chop the graham crackers sheets until all is finely chopped.  Add the melted butter and powdered sugar to the graham crackers and mix well.

Evenly separate the graham cracker mixture into the 24 cups.  Press the mixture firmly onto the bottom and sides.  Bake for 4 minutes in the oven set at 350.

Remove from oven.  Place one piece of the halved chocolate miniature in each cup.  Top with a torn marshmallow, smooth side up.

Place in broil for about 1 minute.  WATCH CLOSELY!  Remove when marshmallow is lightly browned.

Allow to cool a bit before indulging.

HAPPY BAKING!

Oreo Cupcakes

Screen Shot 2015-08-05 at 7.49.26 AM

While I’m not a huge fan of store-bought cookies, I can’t argue with the fact that Oreos are hugely popular.  More importantly, Oreos can be used to create other fantastic desserts.

These chocolate cupcakes have an Oreo stashed inside.  The last time I baked a cupcake with an Oreo inside, I used yellow cupcake batter.  it’s a bit more difficult to see the cookie when you bite or cut into these chocolate cupcakes.  However, if you’re a chocolate lover, does that really matter?  These cupcakes are best to be eaten one day after baking because the Oreo inside becomes very soft.  The buttercream on top is loaded with finely chopped Oreo cookies (not just the cookie part, but the delicious cream filling as well).  By including the cream filling, the frosting tastes even more decadent.  Finally, I couldn’t resist garnishing the cupcake with one half of an Oreo.

Directions:

Chocolate Cupcake:

Any favorite Devils Food recipe will do (even a box cake mix).  After placing paper in muffin tins, fill the muffin cups with about 1 tablespoon of batter – enough to cover the bottom of the muffin paper.  Next, place a full Oreo on top of the batter in such a way that the cookie is centered and is perfectly parallel to the bottom of the muffin tin.  Place another heaping tablespoon of batter on top of the cookie.  Smooth out the batter on top of the cookie.  The entire muffin cup, cookie included, should be filled about to 2/3 to 3/4.  You probably with be able to make a few more cupcakes than you normally do with the same mix.  Reduce your baking time by 5 minutes and carefully watch.  A cupcake is done when you touch the top and the cupcake springs bake a little.

Oreo Buttercream Frosting:

I started with a basic Wilton vanilla cupcake recipe (1/2 c butter, 1/2 shortening, 1 tsp vanilla, 4 c powdered sugar, 1/4 cup of milk – I used more than the recommended amount because of adding the Oreos).  Cream butter and shortening; add vanilla, slowly add powdered sugar while alternating with milk; beat until fluffy.  Crush 12 Oreos in a food processor until there are no chunks (any chunks will block your piping tips and become a headache later).  Mix the chopped cookies with your frosting.  Pipe the cupcakes.  The more frosting the better.

See Related Posts:

Oreo in a Cupcake

oreo cupcake

Slutty Brownies, for a Chocolate Whore

Slutty Brownies

HAPPY BAKING!

Brownie A La Mode

Screen Shot 2015-07-26 at 6.06.39 AM

1 Picky Eater + 1 Picky Eater = 1 Awesome Dessert

My daughter informed me last weekend that it was National Ice Cream Cream and she decided we needed to make some coffee flavored ice cream.  I’m a bit partial to mochas so I decided to throw in some chocolate chips for flavor and texture.  However, my son doesn’t like anything coffee flavored.  I couldn’t very well do a dessert for only one child.  That’s when this idea came to me – brownie a la mode.  Seemed like a perfect solution: my son eats the brownie and my daughter enjoys the ice cream.  I wasn’t neglecting either one of my kids.  The result was beyond all expectations!  It was a sensational flavor and texture combination.

ICE CREAM RECIPE

This ice cream is ridiculously easy to make.  It doesn’t require an ice cream maker.  And, it tastes amazing.  I simply added 7 Tbls of vienna coffee power and 1 cup of chocolate chips (chopped to 1/4 original size)

Here’s a video on how to make it …

BROWNIE RECIPE (really any favorite recipe would work)

Ingredients:

3 eggs

1 c granulated sugar

1 c brown sugar

1/2 c cocoa powder

1 c flour

1 Tbls vanilla

1 1/2 sticks butter, melted

1/4 tsp salt

1 cup chocolate chips

Directions:

1. Preheat oven to 325 degrees and grease 8×8 pan

2.  Beat eggs until fluffy

3.  Add sugars, beat until mixed

4.  Add cocoa powder, flour, vanilla, butter, salt.  Beat until mixed.

5.  Stir in chocolate chips

6.  Pour into greased 8×8 pan

7.  Bake 40-45 minutes, until middle doesn’t jiggle

8.  Allow to cool thoroughly before slicing and serving


French Hot Chocolate for Bastille Day

Screen Shot 2015-07-14 at 7.58.10 PM

Here’s another recipe curtesy of my teenage daughter’s inspiration.  She absolutely loves studying French and decided that we must celebrate Bastille Day.  This French Hot Chocolate is unbelievably decadent.  Unlike hot chocolate in America, this drink is very thick.  A little goes a long way.

French Hot Chocolate

The most decadent dark hot chocolate recipe that tastes just like the French hot chocolate found in Paris cafes. Intense, rich, and absolute heaven for any chocolate lover. Recipe based off of the famous Cafe Angelina in Paris.

YIELD: 2 large, intense cups of hot chocolate or 4 more reasonably-sized cups

PREP TIME: 3 minutes

COOK TIME: 5 minutes

TOTAL TIME: 8 minutes

Ingredients:

  • 1 1/2 cups whole milk
  • 1/2 cup heavy cream
  • 2 teaspoons powdered sugar
  • 1/2 teaspoon espresso powder (optional, but delicious. Will intensify chocolate flavor)
  • 8 ounces bittersweet chocolate, at least 72%, chopped*
  • Giant bowl of whipped cream, for serving

Directions:

  1. In a medium sauce pan over medium heat, whisk together the whole milk, heavy cream, powdered sugar, and espresso powder until small bubbles appear around edges. Do not allow the mixture to boil.
  2. Remove from saucepan from heat and stir in the chopped chocolate until melted, returning the sauce to low heat if needed for the chocolate to melt completely. Serve warm, topped with lots of whipped cream

*Choose the best quality chocolate you can, as the flavor really carries the drink. I love Guittard for a splurge or Godiva, but the Trader Joe’s Pound Plus 72% dark bar is quite good too. I do not recommend chocolate chips, as they contain stabilizers and do not melt as well.

Leftover French hot chocolate can be cooled to room temperature, then refrigerated in an airtight container (empty mason or jam jars work particularly well). Reheat gently the in the microwave or in a saucepan over low heat.

Recipe based off of Cafe Angelina’s Le chocolat chaud à l’ancienne dit “l’Africain,” as interpreted by several sources, including Tastebook and Cooking by the Book.

Recipe (taken from http://www.wellplated.com/french-hot-chocolate/ )

Fourth of July – A Family Thing

Fourth of July Cake

After multiple requests from my daughter, I decided to attempt a flag cake.  Well, I learned a few things during the process.  First, don’t take short cuts.  I bought cheap cake mixes to make the red cake part (trying to save time and a bit of my sanity).  It crumbled when I cut it and therefore I couldn’t make as many layers from each 8 inch round.  Also, I should have chilled each layer of cake before slicing it to make clean cut layers.  Perhaps making all the cake the evening before would have worked better.  Second, the white chocolate chips for stars was a failure.  The chips simply melted into the cake.  While that added to the taste of the cake, it failed to give the appearance of stars in the blue section.  In the end, it was festive.  But no, I would not repeat this cake.

I wouldn’t call this project a complete bust.  I had a ton of cake left over from all the trimmings.  I decided to turn it into cake balls.  For me, the best part of this project was that both of my kids got involved in it.  It has been years since my son has wanted to “play” in the kitchen.  To see both my son and daughter at the kitchen table rolling dough into tie dye bundles was a bigger treat for me than any sugary dessert.  Fourth of July is a great opportunity for a bit of family time.  Having both my kids in the kitchen with me made this the best Fourth of July that I can remember.

Screen Shot 2015-07-05 at 6.50.45 AM

My daughter and I decided that these cake balls were too pretty to coat with white chocolate and decided to leave them chocolate-less.

Check on my post on cake balls for directions on how to make these little bite size dream balls.

Cake Balls

HAPPY BAKING!

Funfetti Gooey Butter Cookies

Screen Shot 2015-06-12 at 6.26.58 AMAs My daughter says, “The sprinkles put the Fun in Funfetti.”  What do you get when take a Funfetti Cake Mix  (white cake with a bunch of sprinkles) and add even more sprinkles?  More fun.  Now, add some cream cheese and you have a fun, decadent cookie.

Funfetti Gooey Butter Cookies

makes approx 30 cookies
Ingredients
  • 8 oz cream cheese, room temperature
  • ½ cup Challenge Butter, room temperature
  • 1 egg
  • 1 box Funfetti cake mix (15.25 oz)
  • ¼ cup sprinkles
  • ¼ cup powdered sugar
Instructions
  1. In bowl beat cream cheese and butter together until smooth, add in egg and continue mixing, scraping sides as necessary.
  2. Add in the cake mix and beat until combined and finally stir in extra sprinkles.
  3. Chill dough for about an hour.
  4. Preheat oven to 350°
  5. Form dough into 1 inch balls and roll in powdered sugar. Place on baking sheet 2″ apart and bake for about 10 minutes.
  6. Allow to cool on baking sheet for 2-3 minutes and then transfer to wore rack to cool completely.

See cookiesandcups.com 

HAPPY BAKING!

Ombre Frosting

Ambre cake

A transition of color for my daughter’s graduation from junior high and transition to high school.  Yes, a little trite but she had been asking for a cake like this for a while and I always like a baking challenge.

Warning: coloring frosting is about art, not math.  Having a degree in engineering, I originally took a mathematical approach to mixing my colors.  I took 1 cup of white frosting and 1 cup of the dark green frosting and mixed the two colors.  I thought that would end up being the middle line of frosting in the cake.  WRONG.  It was way too dark and I ended up using it as the second line from the bottom.

Before applying the ombre decoration on the sides of a cake, skim coat the entire cake and decorate the top.

Decorating Ombre Style

1.  Make a double batch of white frosting (whatever recipe you prefer)

2.  Dye 1 1/2 cups of white frosting to color desired (this will be used as your darkest shade at the bottom) Set aside in a bowl for later

3.  Fill pastry bag, fitted with a decorating tip (here I used a Wilton #32) and about 1/2 cup of the darkest frosting.  Using your decorating skills apply one line of frosting around the bottom edge of the cake.  Squeeze any extra frosting left in your pastry bag back into your bowl of dark frosting.

4. Place the remaining white frosting in your clean mixing bowl

5.  Fill a new pastry bag, fitted with a clean decorating tip and about 1/2 cup of white frosting.  Using your decorating skills apply one line of frosting around the upper edge of the cake.  Squeeze any extra frosting left in your pastry bag back into your mixing bowl.

6.  Place about 1 Tablespoon of the darkest shade of frosting in the mixing bowl of white frosting.  Mix until well combined.  If the shade is not as dark as you desired, add a tad bit more of the darkest shade of frosting and mix well.  When you achieve the perfect desired color.  Fill the pastry bag with this new color.  You can use the same bag and tip but be sure to squeeze out any leftover earlier color in the tip before applying the next line of the new color.    Apply one line of frosting just below the previous line.  Make sure the lines are close together so that no underlying cake shows through.  Squeeze any extra frosting left in your pastry bag back into your mixing bowl.

7.  Repeat step six until you have enough lines to cover the entire side of your cake.  The cake above was a standard two layer cake that was leveled.  I used 8 shades/lines of frosting to fill the entire side.

There are many different ways to apply the frosting to the sides of the cake.  Here are some examples:

Screen Shot 2015-06-08 at 4.55.40 PM Screen Shot 2015-06-08 at 4.56.10 PM Screen Shot 2015-06-08 at 4.54.03 PM Screen Shot 2015-06-08 at 4.54.59 PM Screen Shot 2015-06-08 at 4.54.50 PM

Check out:  BS’ in the KitchenThe Craftsy Blog; Modwedding; Wilton; and Chocolatechocolateandmore

HAPPY BAKING!

Buttercream Truffles

Screen Shot 2015-06-06 at 6.29.41 AM

What do you do with your extra buttercream after decorating a cake?  Eat it with a spoon?  Lick the bowl?  Those are always worthy options.  If you want to turn that extra buttercream into a new dessert then try whipping up some buttercream truffles.  It’s easy, tasty, and makes for a presentable new dessert.

Directions:  Take the extra buttercream and place it in a sealed container.  Store in the refrigerator overnight.  Spoon out about a tablespoon of frosting and roll it into balls.  Place the balls of frosting in the freezer for about 30 minutes.  Melt enough decorating chocolate for whatever amount of buttercream that you have.  Remove the frosting from freezer and dip and cover with melted chocolate.  Allow to cool and dry on wax paper.  Keep at room temperature so that when you bite into these truffles it has a soft gooey inside.

Other ideas:  If you are starting with vanilla buttercream, try adding other flavors to the frosting before placing it in the refrigerator overnight.  The ideas are limitless: coffee, mint, Bailey’s, Rum, chocolate, lemon, or almond extract (just to name a few).  Also, altering the color of chocolate used for dipping can help make these truffles appropriate for any holiday or festive occasion.

HAPPY BAKING!

Blueberry Lemon Pie Bars

Blueberry Lemon Pie Bars

It’s not technically summer yet, but the weather seems to be turning that way.  I decided it was time to switch to some summer flavors.  Lemon always seems to signify summer to me.  Despite my daughter’s hesitation, lemon and blueberry make a remarkable combination.

Blueberry Lemon Pie Bars (recipe from Fresh April Flours)
Prep time
30 minutes
Cook time
1 hour
Total time
1 hour 30 minutes
Creamy and sweet pie bursting with blueberries and citrusy lemon on top of shortbread crust. In portable bar form!
Author: freshaprilflours.com
Yield: 16 bars
Ingredients
FOR THE SHORTBREAD CRUST
  • 1 cup (2 sticks) unsalted butter, melted
  • ½ cup granulated sugar (plus more for sprinkling)
  • 2 teaspoons vanilla extract
  • ½ teaspoon salt
  • the zest of one lemon, divided
  • 2 cups all-purpose flour
FOR THE FILLING
  • 8 ounces cream cheese, softened to room temperature
  • 2 large eggs
  • 1 cup granulated sugar
  • 1 cup (or one 5.3 ounce container) Greek yogurt, lemon flavored
  • remaining zest of one lemon
  • 2 teaspoon lemon juice
  • pinch of salt
  • ½ cup all-purpose flour
  • 3 cups blueberries (fresh or frozen, unthawed)
Instructions
  1. Preheat oven to 350ºF. Line an 8″ x 8″ or 9″ x 9″ baking pan with foil. Leave an overhang on the sides. Set aside.
  2. To make the shortbread crust: stir the melted butter, granulated sugar, vanilla extract, salt, and half of the lemon zest together in a medium bowl. Add the flour and stir until combined. Reserve ¾ cup of the shortbread crust and place in the refrigerator or freezer until needed. Press remaining crust evenly into the prepared pan. Bake for 18 minutes while you prepare the filling.
  3. To make the filling: in the bowl of a stand mixer fitted with the paddle attachment, or in a medium sized bowl with a hand mixer, beat cream cheese on high until smooth. Beat in eggs, scraping down the sides as necessary. Add sugar, lemon flavored Greek yogurt, remaining lemon zest, lemon juice, and salt and mix thoroughly. Add flour and mix again until just combined. Gently fold in blueberries with a spoon or spatula.
  4. Pour filling into crust and add a few blueberries on top of filling. Remove reserved crust from refrigerator and crumble over top of the filling (you may need to separate into crumbs with a knife or fork). Sprinkle with sugar (or Sugar In The Raw). Bake bars for 55-60 minutes minutes, or until toothpick placed in center of pan comes out mostly clean. Allow pan to cool at room temperature on a wire rack. When completely cool, chill in the refrigerator for 1 hour.
  5. When bars are completely chilled, lift out of the pan using foil overhang and cut into squares. Top with lemon zest before serving. Bars can be stored covered in the refrigerator up to 5 days.
Notes
Shortbread crust from Sally’s Baking Addiction

HAPPY BAKING!